
Note - This is a step-by-step quick start. However, you are advised to use our free online training videos which will demonstrate basic and more advanced features visually.
Creating your first presentation
1. Open Repeat Signage by clicking on the Windows Start button (Windows 10), then 'All programs' then 'Repeat Signage V5' then 'Repeat Signage V5'. Alternatively, use the Windows Desktop icon.
2. From the main Repeat Signage screen, click on the 'Presentations' tab then 'Create new presentation' button.
The 'Create new presentation' screen shows you the monitors on your system and their resolutions, i.e. the number of pixels on each monitor, for example 1280x1024, 1440x900, etc. Different display devices, such as LCD monitors and projectors, have different resolutions depending on their make and models. With Repeat Signage you design presentations for particular screen resolutions so that you have precise control over every pixel on screen giving the best possible finished presentations. Having said that, the Repeat Signage player will scale presentations to the screen.
3. Select 'This computer screen' option and then click on the 'Next' button. It will then show you the templates tab but keep to the 'Blank presentation' option then click on the 'Create' button which will create a new presentation full screen and load the Repeat Signage Designer.
You will notice that you cannot see the Windows start menu bar and that the designer covers the entire screen. This is because Repeat Signage allows you to decide what to display on your screen pixel for pixel. The menu is the on the top right side of the screen. This can be used to add new controls onto the designer surface. Let's start by inserting a picture control.
4. On the menu, click on 'Insert' then 'Insert picture'.
We will insert a local or network picture. There are also options to insert images from Internet websites and your free RepeatServer.com account in the Repeat Signage Standard and above editions.
5. Click on 'On local or network drive' then click on browse select 'Shopping0010-800x600.jpg' that is a sample image installed within Repeat Signage. Click on 'Open' to return the image name to the 'Insert picture' screen and then click the OK button to put the image on the screen. New controls appear in the middle of the screen.
Repeat Signage works in the same way as many software programs when moving and resizing objects. To move a picture control, then click on it and hold down the left mouse button and drag the control to the required position on screen, then release the left mouse button. To resize the control, click on it once and you will see little squares appear in the corners of the image control. Resize the control by clicking on one of these and hold the left mouse button down and then drag the control to the desired size, then release the left mouse button.
6. Alternatively, you can also drag your picture to location X100, Y100 (look on the bottom of the menu when moving an object as this shows the X (horizontal) and Y (vertical) coordinates of the top left of the control). Alternatively, click on the picture control one to select it, then on the menu you will see it's position in the 'Position on screen' section. You can change the numbers here to 100 x 100 and press the Enter key on your keyboard to change the position.
7. We will show you another way to position. Right mouse click the picture control to show the menu:

and select 'Size' then '1/4 screen'. Then right mouse click again and select 'Position' then 'Centre screen'.
8. Next, let's add a plain Text label control. On the menu, click on 'Insert' then 'Insert text label'. On the screen that appears just type in 'My first presentation' and click on OK.
You may have noticed that when you insert a Text label control, you can get plain text Files on local or network drives or from Internet websites or RepeatServer.com using the Standard and above editions of this software.
9. Now we are going to look at the properties of the text so that we can alter the font, colours, size, etc. Double click the Text label control that you have just inserted and this will open it's properties form.
10. There are tabs across the top of this form. Click on the 'Font/alignment' tab to display the fonts installed on your system. Select the 'Arial' font then change the font size to 26 and change the font style to bold. Then click on the 'OK' button to make the change to your text.
11. You will then need to resize the control to fit the new font size. This time, click on your Text label control to highlight it, then click on one of the corner squares (resizer handles) and widen so that you can see all the text.
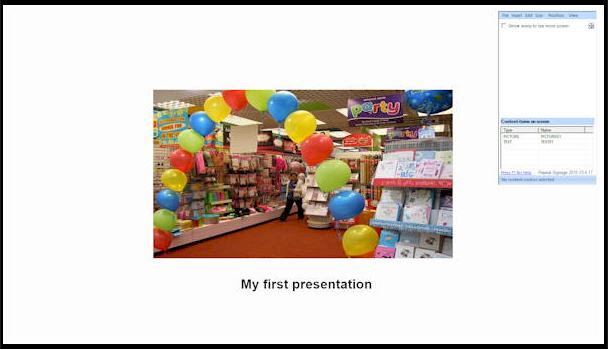
12. Now move your Text label control to under the picture control. Your finished presentation should look something like the picture below:
13. Now save your presentation. On the menu, click on 'File' then 'Save'. You will be prompted for a file name. Enter 'FirstPresentation' and then click on 'Save'.
One note before we close your first presentation. Repeat Signage has a context-sensitive help system which means that appropriate help is available whenever you press the F1 key on your keyboard. On the designer screen, pressing F1 will give you information adding, resizing, moving and deleting all the types of controls (text, PDF, pictures, movies, etc) in Repeat Signage.
14. Close your presentation by going to the menu and selecting 'File' then 'Exit' to return to the main Repeat Signage screen.
Next - Playing your first presentation