
Banner control for pictures or pictures with text
| Supported file types | *.png, *.gif, *.jpg, *.jpeg, *.bmp, *.tif,
*.wmf, *.pdf, *.doc, *.docx, *.odt, *.rtf, *.xps, *.rpic, *.xls, *.xlsx,
*.ppt, *.pptx |
| Playlist support | Yes |
| Scheduler support | Hourly, daily and weekly scheduling |
| Scrolling support | Yes |
| Rotation support | No |
| Display options | BANNER 02 - Pictures with optional 1 line of
text. 35 picture transition effects plus 35 text transition effects FADER 01 - Is a large screen, high performance picture fader with no text |
| File locations | Files and folders on local or network drives (all
editions), Internet websites,
RepeatServer.com and FTP sites (Standard and above editions) Corporate and Media Wall editions - Collect pictures from databases. |
| Data input | Manually add items in a play list. In the Standard and above editions, you can also select a Repeat Signage Picture RSS feed which can be created free at
www.repeatserver.com. Repeat Signage Picture RSS feed allow
this Banner control to be remotely updated with new pictures and text.
Corporate and Media Wall editions - Collect pictures from databases. |
| Training videos | Repeat Signage Control - Banner Control displaying images and text (03:48 min/secs) |
| Repeat Signage Control - Banner Fader Control for displaying images on high definition screens (02:18 min/secs) | |
| Repeat Signage Control - Banner Control display images and text from a database (6:46 min/secs) | |
| Repeat Signage Control - Datagrid Control display text from a database (Corporate and Media Wall editions only (07:36 min/secs) | |
| YouTube videos |
RepeatServer.com - Creating and using Banner RSS feeds |
Description
This control allows you to display pictures with text over the top and gives you the ability to have transitions between pictures. This option is called BANNER 02 and the text is optional so you can just use this to display pictures with nice transition effect. There are currently 35 picture transition effects that you can use and 35 text effects. For each picture you can also optionally specify a title to go with it. There are 35 different transition effects for text. This can be useful when displaying items for sale. For example, in an estate agents window a selection of houses can be shown with a title such as '£100,000 Boston'.

The above images show text that can optionally be added to pictures in the playlist. The first just has a title and then second has a title and description. The font size, font colour and background colour can be specified for both the title and description. The positioning of the text can also be adjusted.
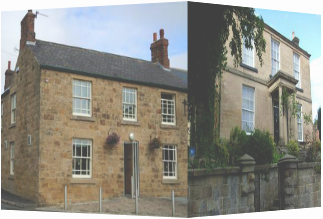
The above picture shows the house image rotating off with the transition effect 'Cube rotate right' so that the next house picture displayed.
The Banner control doesn't just display pictures, it can display PDF files, multipage TIF files, Microsoft Word documents (.doc/.docx), Excel spreadsheets and Microsoft PowerPoint slides. With multi-page documents, such as PDF files, you can use the Page tab to choose which pages to display:
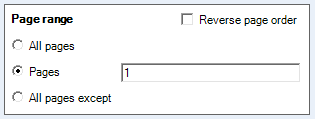
which lets you select a page, specify a range or all pages
With the Standard and above editions, this control is remote updatable. You can now choose to play a Repeat Banner Picture RSS feed which is a text file (in XML format) containing a play list of pictures, text to be displayed and the transition effect required. These can be created on our free www.repeatserver.com service which allows you to update a presentation with this control in from anywhere in the world. This works by you uploading your pictures to www.repeatserver.com (or your organisation's website), and then you can create a new Banner Picture RSS feed and select you pictures to build a play list.
The BANNER 02 option of the Banner control was the original way of displaying pictures and text.
FADER 01 - This gives a simple high performance fading play list. It doesn't allow you to enter a text description that BANNER 02 does. This was added for displaying full screen pictures on True HD screens (1920x1080) or on multiple screens, and as such the fading of FADER 01 is gives a better quality of fade especially if you are using older hardware. We trialled this with a US hospital that was displaying a single presentation across a 6-screen video wall.
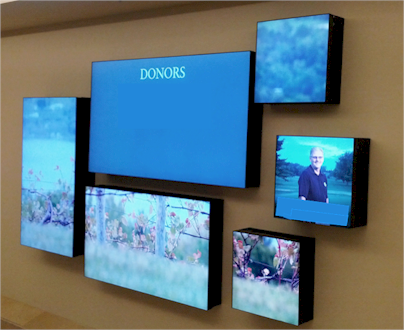
Details of donors (spreadsheet/document) have been removed for security purposes.
An artwork image spans all 6 screens, with individual screens changing information at pre-set times
There are 4,000+ Repeat Icons for you to use in your presentations. These can be displayed by the Picture control (single picture) and the Banner control (multiple pictures). These are available in the main Repeat Signage designer and also in the Repeat Pictures system which can be used to create adverts/pictures.

With our Corporate and Media Wall editions, you also have the option of collecting pictures and text from a database. To do this, then on the 'Location choice' tab, select 'Collect playlist from a database'. This means that this control can also be used to scroll, animate or display a list of text items. Use the help pages on each tab to guide you though the process.
You can display Excel spreadsheets. These are for whole pages from a spreadsheet file, the same as you would see if printed out. If you want to display specific sheets and cells from a spreadsheet, then use the Spreadsheet control instead. Repeat Signage also includes a datagrid to create your own spreadsheets. (Standard and above editions only).
You can also display Microsoft PowerPoint .ppt and .pptx files with this control. This works by the control automatically splitting the PowerPoint presentation into individual pictures of each slide and then playing them. See Using Microsoft PowerPoint presentations in Repeat Signage for a walk through.
There is now a 'Image of a website page' option that allows you to take a snap shot picture of a website and display this and these can be added to a play list the same as any other picture. See Image of a website page for more details.
Single Banners (BANNER 02)
On the designer screen menu, click on 'Insert' then 'Insert Banner'. Once on this screen, you can add pictures to your banner using the 'Add' button. This will allow you to add a single picture, and you can also optionally add text to go with the picture. You can also specify a transition effect which is used to load the next picture. You can add multiple pictures if required. Once you have added at least 1 picture file, then click on 'OK' to add the banner to the presentation. After adding this control to the screen, you can then position and size your banner control as required. Double click the banner control to view the properties.
Playlists of banner files (BANNER 02)
Most Repeat Signage controls only allow you to display a single file. However, with this control, you can create a play list of pictures straight away. This is only really useful if you are going to scroll videos with the next section. You can create a play list of banner files so that many banner files can be displayed, one after the other:
1. On the designer screen menu, click on 'Insert' then 'Insert Banner'. This will allow you to choose a file. This defaults to 'On local or network drive'.
2. Click on the browse button and choose an image and then click on 'Open' to return to the previous screen.
3. Now click on OK to insert the new control onto the designer. You can then position and size your control as required.
4. Double click the Picture control to view the picture control's properties.
5. Put a tick in the 'Use play list instead' tick box. This will take you to the Playlist tab. Your first image appears in the grid for you.
6. Use the 'Add' button to add other files to the list.
You can also use the 'Add from this computer' button to insert multiple images.
NOTE - You could also use 'Add blank' to add blank items which can be used to give a pause between playing your banner files. For example, you could insert a single banner file and set it to display for 2 seconds. Then insert a blank item again for 2 seconds. This would then give the effect of flashing the banner file on and off the screen.
7. When you have added your play list files, then click on the OK to close the properties screen and return to the designer. Your play list will start playing immediately. Then length of time each item will display for will depend on how long you specified for each play list item.
Scrolling Banner files (BANNER 02)
1. Follow the instructions for 'Playlist of banner files' above.
2. Open the picture control's properties by double clicking it and then selecting the 'Scrolling tab'.
3. Change the 'Scroll direction' combo box to an entry other than NONE, for example RIGHT TO LEFT. Click on OK to see it scrolling.
For more scrolling options, on the properties 'Scrolling tab', press the F1 key to see the various options. Also see Single, playlist, scrolling and advanced scrolling for visual examples of what is currently possible.
Scheduling the playing of Banner picture files (Standard and above editions only) (BANNER 02)
The information on creating a play list above shows you how to create a play list that just loops files. On the play list tab, there is a 'Schedule type' drop down list. You can change this from 'PLAYLIST' to 'HOURLY', 'DAILY', or 'WEEKLY'. The difference between this and the 'PLAYLIST' option is that when you add items you have to specify 'From' and 'To' time values. You can specify a play list of videos files to play in a particular period.
For example, an HOURLY scheduler can be used to play a file at the start of every hour for 1 minute (0 minutes 0 seconds to 0 minutes 59 seconds). You have to put in files to cover the entire hour. If you don't want anything playing for the rest of the hour, then insert a blank item that covers from 1 minute 0 seconds to 59 minutes 59 seconds. At the end of an hour, the entire hourly schedule will loop again. When you play a presentation, it displays items based on the current time or day.
When you add a blank item, you can decide whether to make the blank item display the background of the control (which you can specify a colour or picture for) or whether to make the entire control invisible. When adding or editing a blank item, go to the 'Blank item' tab and either tick or un-tick the 'Entire control is visible' box. This is useful for scheduling when you want a control invisible.
The DAILY schedule type allows you to specify files and blank items to cover the entire day. At the end of the day, the schedule will start again. WEEKLY allows you to schedule what happens on each day of the week (at any time), and then restarts at the beginning of the next week. Repeat Signage uses Monday as the first day of the business week. Another thing to note is that every control that supports scheduling runs independently of all others, so you can have lots of different controls all doing different things.
Tools have been added to Repeat Signage to help you test scheduling. On the designer screen menu, you can click on 'View' then 'View program time for schedule testing'. Clicking on this puts the time on the bottom right of the designer screen menu. This is the clock that Repeat Signage uses with controls. You can change this time using 'View' then 'Change program time for schedule testing'. This allows you to change either the time or date, so that you can see what will be displayed at any point. For example, you may have an 'offer of the day' for each day of the week, made by displaying pictures in a picture control. Changing the program date to another day will allow you to test that the correct picture file, with that day's offer on, is being displayed.
Remote updating of the Banner control from RepeatServer.com (Standard and above editions) (BANNER 02)
You can create a free RepeatServer.com account and use this to upload picture files to your online account for playing with this control. You can then create a Banner RSS feed in your RepeatServer.com account which is a text file that contains your playlist of pictures, plus the text and transition effects to go with them. When you have created this file, then you point your Banner control at it from within your Repeat Signage presentation. Your Repeat Signage presentation will then play your play list. When you later log onto your RepeatServer.com account and change the play list, then your Repeat Signage presentation will automatically update itself and download all the necessary pictures to do this.
Here is how to do this, step by step:
1. Create a free RepeatServer.com if you haven't already done this. This can be done by visiting www.RepeatServer.com in your web browser or via the 'RepeatServer.com' tab on the main Repeat Signage screen.
2. Log onto your RepeatServer.com account and on the menu click on 'File' then 'Upload files'.
3. Use the 'Browse' button and then locate the picture files you want to display on your hard disk (hold down your keyboard Ctrl key to select more than one at a time) and then click the 'Upload' button. Just select 2 or 3 for a test.
4. On the RepeatServer.com menu, click on 'RSS Feeds' then 'Repeat Banner RSS feed list'.
5. Click on the 'Add new RSS feed' button.
6. Enter a name, title and description. These aren't shown to users but help you distinguish different feeds when you have several of them. The file name must be unique and end in '.xml'.
7. Click on the 'News items' tab and click on 'Add item'.
8. Enter a 'Title' and 'Description'. If you look at the picture below, then the Title (£100,000 Boston). Also choose one of your uploaded images from the drop down list. If there are no pictures there, then you need to upload some first. Also select a 'Transition' effect and click on 'Add' to save this item.
9. Repeat Step 8 and add a second item.
10. Now click on the 'Save' button to save your Repeat Banner RSS feed and it will return you to the list.
IMPORTANT NOTE - When you first create a Repeat Banner RSS feed (or a standard RSS feed) then it is published automatically. When you edit a feed (by selecting the edit button next to it) and add or remove items, then the RSS feed file DOES NOT automatically change. You have to then click on the 'Publish' link next to your feed in the list. This is so that you can go in and change items, or one of your colleagues can, or both of you, but then the presentations using these feeds don't get updated until you are ready to publish the new version.
11. Back to Repeat Signage. Go to the main screen and select the 'RepeatServer.com' tab. If you haven't already linked your Repeat Server account to Repeat Signage, then you will need to follow the instructions on screen. When this has been done, then please click on the 'Refresh' button to display all your Repeat Server files, which should include all the pictures you have uploaded and also the Repeat Banner RSS feed you have just created. This needs to be visible before we can continue.
12. Create a Repeat Signage presentation on your computer or open an existing one. In the Repeat Signage designer, click on 'Insert' then 'Insert Banner'.
13. Then select 'Collect playlist from an XML text file', then select the 'RSS feed location' tab.
14. Click the 'RepeatServer' option and a list of your RSS feeds will be displayed, which will include the one you just added above. Now select this feed by clicking on it, then click on the 'OK' button.
IMPORTANT NOTE - It may take 10-20 seconds the first time you do this. This is because Repeat Signage has to download all your picture files to the 'system cache' in order to play them.
Your Banner control will now be on screen and playing your playlist. You can resize this as required.
15. Double click your new control to see it's properties. Click on the 'Refresh' tab. By default, new controls that are collected from a website location will automatically check for changes every 15 minutes. You can set this value appropriately. If you need the presentation to update itself almost as soon as you make a change online, then set this value to check every minute.
To give this a test:
16. Log onto your RepeatServer.com account and edit your feed. You can upload more pictures if required. When you have finished changing it, then click on the 'Publish' option.
17. Your presentation will update itself (even in the Repeat Signage designer) within the refresh time. If this is still 15 minutes, then you may need to wait a little while before you see your banner control update itself.
The Repeat Software support team are happy to help if you have any problems. Contact us at support@repeatsoftware.com.
Displaying images and text from a database with the Banner control
You can display images and text from a database and filter using an SQL statement or the SQL wizard, with the Banner control.This feature is only available in the Repeat Signage Corporate or Media Wall editions. See the how-to video (7 mins).
You can also display data from a database with the datagrid control.
Displaying Microsoft Excel spreadsheet pages with the Banner
control
See Microsoft Excel and
OpenOffice Calc spreadsheets in Repeat Signage digital signage software.
PDF and Word document compatibility
See our PDF file compatibility page if
you have any issues with displaying PDF files and our
Microsoft Word and OpenOffice
Writer documents in Repeat Digital Signage software if you have any
problems with Word documents.
Repeat Pictures (.rpic files) - Creating pictures and adverts to use
with the Banner control
Repeat Pictures are a picture format that allows you to use pictures,
PDF files, documents (MS Word and OpenOffice Writer), text files, RTF files,
shapes,
as well as manually entered text to create images. You design still images
and then save the file which has a .rpic extension. See
Repeat Pictures for more
information. You can display .rpic fles with this Banner
control.
There are a number of templates included to help get you started, and we
will be added.

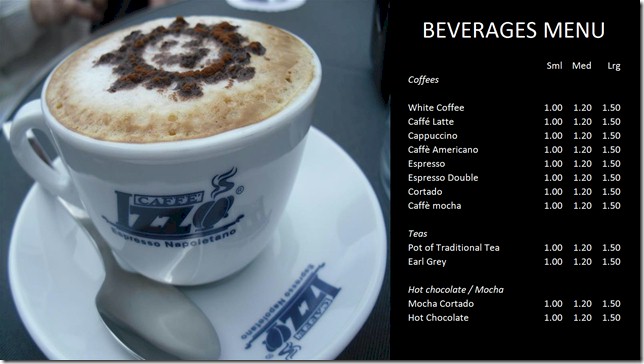
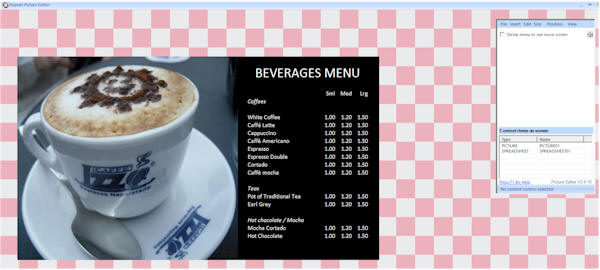
Creating menus with Repeat Pictures and the Spreadsheet control
The Spreadsheet control
(or Insert Data Grid)
can be used to easily add grids of information into pictures, which you can
then play with the Banner control. This is available in all
editions of Repeat Signage. The menu example below is made up of a
combination of a large picture and a spreadsheet grid:
Here is a walk through of how to use our menu templates and display with the
Banner control:
1. From the main Repeat Signage screen, click on 'Create' and then
'Create Repeat Picture'.
2. Click on the 'Menus' group which will show you a number of menu
templates. Select 'Menu01-16to9' and click on 'Next'.
3. Select the number of pixels to make your picture. For
example, if you are going to use the banner control full screen on a
True HD display screen, then you would select 1920x1080 pixels.
Then click on 'Create'.
4. The template is displayed on screen in the Repeat Picture editor:
You can change the picture by double clicking it and selecting another one.
You can change the menu by double clicking it. This is a 'Built-in
spreadsheet' and you can then use the 'Edit spreadsheet' button to display
the spreadsheet full screen and you can chance as required. It uses a
familiar spreadsheet layout, and rows, columns and cells can all be
individually customised.
5. When finished editing, then from the menu, click on 'File' then
'Save' and save your new picture. We are calling ours 'MyMenu01'.
This will have a .rpic file extension such as 'MyMenu01.rpic'.
6. From the menu, click on the 'Presentations' tab and the
'Create new presentation'.
7. Select 'Screen on this computer' and click on the 'Next' button.
(Note - If you were creating a presentation for a True HD screen, you would
have used the 'Screen on another computer' button and then chosen 1920x1080
instead).
8. Click on 'Create' to create a new blank presentation.
9. Your new presentation will open in the Repeat Signage designer.
From the menu, click on 'Insert' then ' Banner (Pictures with text)'.
10. The screen displays a play list. Click on the 'Add' button
and then use the 'Browse' button and select your menu file. We called
ours MyMenu.rpic.
11. Click on 'OK' to add your file to the list. Now at the
moment we just have a single menu file.
12. Click on 'OK' to add the Banner control to the screen.
13. Now right click your new Banner control and select 'Size'
then 'Full screen' from the menu to make the control full screen. If
your computer has a wide screen monitor, then this will look great. If
your computer has a normal shaped screen then our widescreen template will
look a little squashed. It's a case of matching template and screen
shapes. You can always go back later and use a non-widescreen template
instead.
14. You can now save your finished presentation from the File menu.
If you are using the Banner control, you need to create some more menu
files, or adverts, using the Repeat Picture system. You can also
double click the Banner control in the designer if you want to change
the transitions between pictures and also the default time between
pictures. There are 35 transition effects, such as fade, with the Banner control.
If you are just displaying a single menu within a presentation, and you
don't want it moving, then you could display your MyMenu01.rpic file with
our Picture control instead, so that if
just stays put on screen. You can also use the
Spreadsheet control to just display
the menu grid within the presentation directly if required.
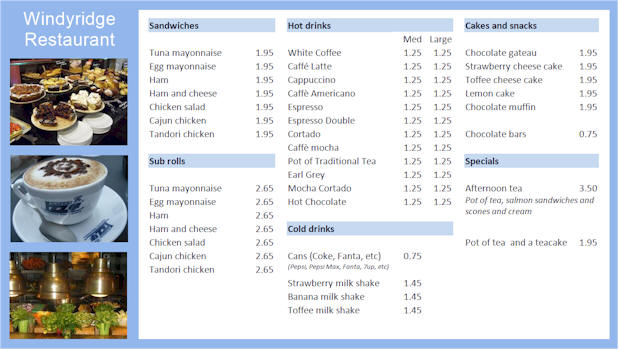
Another menu template example:
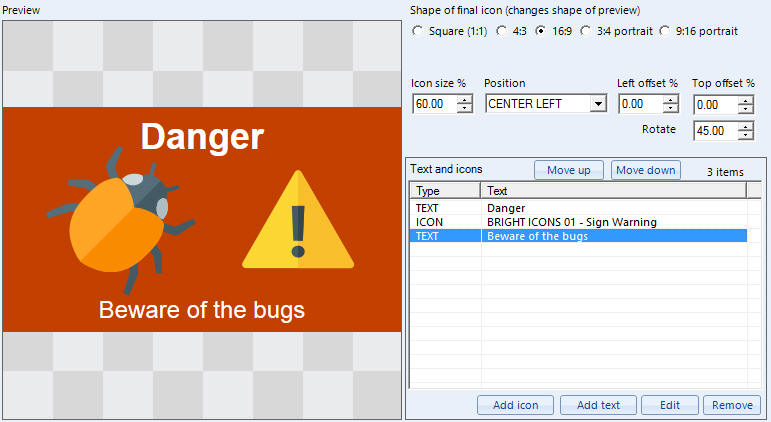
Repeat Icons
You can use any of our
Repeat Icons to help you create simple signs
with this control. Repeat Icons allows you to build up a picture/slide to play with this control by
combining text and icons. There are also thousands of additional icons
available.
Remote update using FTP sites and linking to existing applications
You can link this control with existing computer systems if required.
For example, your IT Department could create XML files in the same format as
our Repeat Banner RSS feed file from an existing bespoke application.
If the pictures files are placed in the same folder as the .XML file, then
Repeat Signage will read and play these files, and update itself every time
the .XML file changes. These files can be located on either
local/network drives, on websites, or on an FTP site.
Unicode support for Chinese, Japanese, Russian, Greek and other characters
From version 2.5.8, Repeat Signage now supports Unicode characters such as
Chinese characters. The only restriction is that you cannot use then
within the actual file name. See Unicode
support in Repeat digital signage software for more details.