
Playlist tab
You can specify a play list which allows multiple files to be shown one after the other, at time intervals you specify. Put a tick in the 'Enable play list' to use this feature.
For example, if you were an estate agent, you may have a dozen pictures of example properties for sales. You could create a picture control and enable the play list. Then add each picture to the play list and specify that the 'Default play time for items' was 5 seconds. Then every minute, each picture would be shown one after the other. Each play list item (property pictures in this example) can be controls separately. For example, you may want to show some pictures for 5 seconds and others for 10 seconds. You can do this by double clicking a play list item to edit it. You will then see various options on how you want individual pictures to be played.
A play list can also be used with the Scrolling tab to scrolling items across the screen.
IMPORTANT NOTE - Hourly, Daisy and Weekly scheduling is a feature of the Standard and above editions and isn't available in the Standalone edition.
YouTube videos
Controls - Creating play lists
Controls - Scheduling individual controls
Different kinds of 'Add' buttons
Depending on the control type (Picture, Banner, etc), there are several type of Add buttons for adding new items to the play lists:
Add - This is our traditional add screen that allows you to choose a file from your computer, from an Internet website, from a free RepeatServer.com account or from an FTP site. This gives maximum flexibility but only allows you to select a single file at a time, which can make data input a bit slow.
Add from Repeat Server - (Standard and above editions) If you have set up a free RepeatServer.com account they you can upload files into your account which can then be selected in the Repeat Signage Designer (Standard and above editions). This opens a screen which allows you to select 1 or more files at once and then return them to your play list. You can hold your keyboard Ctrl or Shift keys whilst clicking items to select multiple items.
Add from this computer - This allows you to browse for a file or files on your computer, or a network drive. This allows multi-select so that you can select several files at once. This allows far quicker data input that our 'Add' button. You can hold your keyboard Ctrl or Shift keys whilst clicking files to select multiple items. Note - The order they are added to the grid depends on the current sort order of the browse dialog box.
'Files in presentation folder' tick box
This check box is only enabled if you have saved your presentation. Ticking this box means that when you use the browse button you will just look in the same folder as the presentation. This allows you to use relative paths (such as MyPicture.jpg) rather than absolute paths (such as c:\Pictures\MyPictures.jpg). See Using Repeat Signage with Dropbox.com for why you may want to use this option.
Blank items
Blank items allow you to have gaps in play lists where nothing is displayed, or to have gaps when scrolling pictures, etc. For example, you may have two pictures scrolling across the screen, but you want to put a white gap (or a transparent one) in between the pictures.
In terms of gaps with an audio control, you may just not want any sound playing for a period of time. You can also use gaps as the first play list item. This effectively delays the start of the playing.
Transitions
Some controls such as the Picture control have transitions. If the current control supports this, you will see this panel:
The 'Default transition type' and 'Transition duration' boxes will appear if you can use these. When you add a play list item the these is a transition tab and you can visually choose a transition such as 'Fade' if required. The 'Default transition type' box allows you to specify a default transition for when you add new play list items. The 'Transition duration' value is how long a transition, such as fading from one picture to another, takes in seconds. The higher the number the longer the transition takes.
Deleting items
The play list grid is multi-select so you can hold the Ctrl key on your keyboard, click on specific items to select them and the use the 'Delete' button to collectively remove them from the list.
'Move up' and 'Move down' buttons
The 'Move up' and 'Move down' button are used after you select a single item from the grid. This will move that item up or down the list so you can adjust the order they are played in.
Default play time for each item
When you add an item to the grid the you can choose how long that item (such as a picture) is displayed on screen. New items default to using the contents of the 'Default play time for each item' box:

This gives a really easy way of setting all items to play for a set amount of time. You can double click individual items to open it's properties:
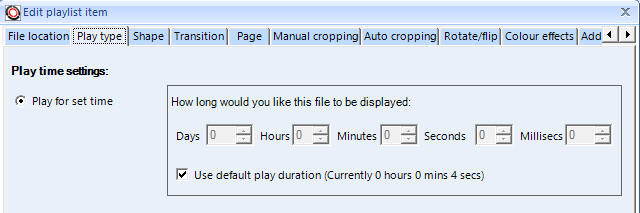
and then on the 'Play type' tab, take the tick out of the 'Use default play duration' tick box and then you can specify how long you want this individual item to play for.
Schedule type - Hourly, daily and weekly scheduling (Standard and above editions only)
Most Repeat Signage controls (pictures, text, video, audio, etc) allow you to use playlists. The different types are PLAYLIST, HOURLY, DAILY and WEEKLY. PLAYLIST just revolves a list of items, such as pictures starting when the presentation is played. However, HOURLY, DAILY and WEEKLY schedule pictures, etc, based on the current day of the week and time.
For example, you may have a restaurant and use a picture control in DAILY mode to display different menu images depending on the time of the day. A picture of a full English breakfast could be displayed between 8am and 11am, a picture of lunch sandwiches between 11am and 3pm and a picture of steak and chips from 3pm till 11pm. You can schedule the 3 pictures to change to the correct ones automatically. However, if you play the presentation you are just going to see the appropriate pictures for the current time of day. You may want to test how these look at different times of the day. The 'Change program date/time' option can be used to set the program's date and time to a particular point. For example, you could set it to 10:59:30 (10:59am and 30 seconds) so that you can see the breakfast picture and as you watch the time change on the status at the bottom of the menu change from 10:59:59 to 11:00:00 you will be able to see it change to the lunchtime picture. It if doesn't then you have probably typed the wrong time in.
These are step-by-step instructions of how to do this with the Picture control:
- Create a new presentation or open an existing one
- From the main menu, click on 'Insert' then 'Insert picture'
- Choose a picture file that has the first menu on it and click on the 'OK' button
The picture control appears on screen showing the first menu picture
- Now double click this picture to open it's properties
- Click on the tick box 'Use play list instead'
The play list tab will be displayed with a 'Schedule type' set to PLAYLIST
- Change the 'Schedule type' combo box to 'DAILY'
The combo box is then blanked out as it is the first time we have look at the DAILY schedule for this control
- Click the 'Add' button, select the first menu picture again, then set the 'From' time box to '00:00:00' and the 'to' time box to '10:59:59' and click on the 'OK' button
- Click the 'Add' button again, select the second menu picture, then set the 'From' time box to '11:00:00' and the 'to' time box to '14:59:59' and click on the 'OK' button
- Click the 'Add' button again, select the third menu picture, then set the 'From' time box to '15:00:00' and the 'to' time box to '23:59:59' and click on the 'OK' button
You should now see the DAILY play list with all 3 of your menu picture files in
- Click on the 'OK' button to finish changing the properties
The menu picture you see will now depend on what time it is. If it is before 11am in the morning then the first picture will show. If it is after 11am, then the second picture will show. You should now test this control.
To test that you have correctly entered the times and that the right pictures are selected, then:
- On the main menu, click on 'View' then 'View program time for schedule testing'
A new label will appear at the bottom of the menu called 'Prog time' which shows the current date and time that the program is using for scheduling.
- On the main menu, click on 'View' then 'Change program time for schedule testing'
A window will be displayed allowing you to set the program date and time. This does NOT alter the Windows system time.
- Change the current time to 10:59:40 and click on the 'Apply' button
You will see that the 'Prog time' at the bottom of the menu changes to 10:59:40 and you can see the time ticking away toward 11:00:00. The picture on screen now should be the first picture and you should now see the picture change to the second picture at 11:00:00. You can repeat by changing to 14:59:40 and make sure the third picture appears when it is supposed to.
Schedule type - iCal file (Standard and above editions only)
This is only available on some of our controls, such as the Text Label and Picture controls. This allows you to use a standard iCalendar schedule file to display items on screen on set dates and times. See iCal control play lists.