
Text label control
| Supported file types | .txt and manually typed in text |
| Playlist support | Yes |
| Scheduler support | Hourly, daily and weekly scheduling plus iCalendar file support |
| Scrolling support | Yes |
| Rotation support | 0, 90, 180 and 270 degrees |
| File locations | Files and folders on local or network drives (all
editions), Internet websites,
RepeatServer.com and FTP sites (Standard and above editions) Corporate and Media Wall editions - Collect text from databases. |
| Transitions | 25 transition effects when using this control in play list mode |
| Controls based on Text label control | Clock (text based) control and Shape control |
| Text to speech | Yes |
| Training video YouTube videos |
Repeat Signage Controls - Text Label control
(All editions) (06:33 min/secs) Repeat Signage Controls - Text Label control displaying single line of text from a database (Corporate or Media Wall) (06:33 min/secs) Using the Repeat Signage Text Manager to edit files on a network drive Using the Repeat Signage Text Manager with RepeatServer.com Control scheduling in Repeat Signage |
Description
There are two types of Text label control within Repeat Signage. The Text label control and the Text block control. The Text label control is for plain text (the font, colour, etc, is the same for the text displayed) and allows effects such as using an image instead of a colour when displaying text. The text label control is ideal for single lines of text such as for headings. You can also make the font and back colours transparent so that they can sit on top of other controls. The Text block control allows the mixing of colours/fonts, etc, and is similar to a Microsoft Word document.
Text can either be typed in manually, or collected from a .txt file. The advantage of collecting text from a file is that this could be put on a network drive and changed at will. A playing presentation can be set to monitor the text file and automatically display the new text when the file changes. You have to double click the control to open the properties and use the 'Refresh' tab to configure this. Press the 'F1' key on your keyboard on this tab for more information. This can be useful for displaying 'Welcome XXX Company' in reception areas and changing instantly as necessary.
25 transition effects have been added for when the playlist is used.
Text Manager allows easy update of text files displayed with this control and to facilitate easy remote updating of presentations.
Database support and data formatting added so that you can collect text and numbers from databases. (Corporate and Media Wall editions only).
Use iCalendar files to schedule control content.
Simple Text
On the designer screen menu, click on 'Insert' then 'Insert text label'. This will allow you enter text in the box or select a file to collect text from. You can then position and size your Text label control as required. Double click the Text label control to view the properties and change the font, colours, etc.
Playlists of text and text files
You can create a play list of Texts. Insert Text as for 'Simple Text' above. Then double click the Text label control to display it's properties. Put a tick in the 'Use play list instead' tick box. This will take you to the Playlist tab. Your first Text appears in the grid for you. Use the 'Add' button to add other Texts to the list. Use 'Add blank' to add blank items which can be used to give a pause between playing your gif files. For example, you could insert a single gif file and set it to display for 2 seconds. Then insert a blank item again for 2 seconds. This would then give the effect of flashing the text on and off the screen.
Scrolling text and files
Create a play list of Texts (see above). Open the control's properties by double clicking it and select the 'Scrolling tab'. Change the 'Scroll direction' combo box to an entry other than NONE, for example RIGHT TO LEFT. Click on OK to see it scrolling. For more scrolling options, on the properties 'Scrolling tab', press the F1 key to see the various options.
Also see Single, playlist, scrolling and advanced scrolling for visual examples of what is currently possible.
Scrolling text vertically
You can either scroll horizontal text up or down the screen, or change the text to be vertical and then scroll it. To try both methods:
- Add a Text label control as per the information in 'Scrolling text and files' above so that you have a horizontal scrolling text.
- Double click the Text label control to open the properties.
- Click on the 'Scrolling' tab and change the 'Scroll direction' drop down box to 'BOTTOM TO TOP' and then click on the OK button.
This scrolls the text up the screen, but the text is still horizontal. To change to make the text vertical:
- Double click the Text label control to open the properties.
- Click on the 'Rotate/flip' tab and select the '270 DEGREES' option then click on the OK button.
You now need to move and resize the control so that the control is in the top left corner of the screen and resized to be the screen height:
- Click on the RSS control and then right mouse click and select 'Position' then 'Top left'
- Click on the RSS control again and then right mouse click and select 'Size' then 'Screen height'
- You will also need to alter the width of the control to say 50 pixels which you can either do by resizing using the control's resizer handles or on the menu change the 'Size in pixels' section.
Scheduling the playing of text and text files (Standard and above editions only)
The information on creating a play list above shows you how to create a play list that just loops files. On the play list tab, there is a 'Schedule type' drop down list. You can change this from 'PLAYLIST' to 'HOURLY', 'DAILY', or 'WEEKLY'. The difference between this and the 'PLAYLIST' option is that when you add items you have to specify 'From' and 'To' time values.
For example, an HOURLY scheduler can be used to play a file at the start of every hour for 1 minute (0 minutes 0 seconds to 0 minutes 59 seconds). You have to put in files to cover the entire hour. If you don't want anything playing for the rest of the hour, then insert a blank item that covers from 1 minute 0 seconds to 59 minutes 59 seconds. At the end of an hour, the entire hourly schedule will loop again. When you play a presentation, it displays items based on the current time or day.
When you add a blank item, you can decide whether to make the blank item display the background of the control (which you can specify a colour or picture for) or whether to make the entire control invisible. When adding or editing a blank item, go to the 'Blank item' tab and either tick or un-tick the 'Entire control is visible' box. This is useful for scheduling when you want a control invisible.
The DAILY schedule type allows you to specify files and blank items to cover the entire day. At the end of the day, the schedule will start again. WEEKLY allows you to schedule what happens on each day of the week (at any time), and then restarts at the beginning of the next week. Repeat Signage uses Monday as the first day of the business week. Another thing to note is that every control that supports scheduling runs independently of all others, so you can have lots of different controls all doing different things.
Tools have been added to Repeat Signage to help you test scheduling. On the designer screen menu, you can click on 'View' then 'View program time for schedule testing'. Clicking on this puts the time on the bottom right of the designer screen menu. This is the clock that Repeat Signage uses with controls. You can change this time using 'View' then 'Change program time for schedule testing'. This allows you to change either the time or date, so that you can see what will be displayed at any point. For example, you may have an 'offer of the day' for each day of the week, made by displaying pictures in a picture control. Changing the program date to another day will allow you to test that the correct picture file, with that day's offer on, is being displayed.
Playing text labels from RepeatServer.com
You can create a free RepeatServer.com account and use to create and edit 'text labels' to use in your Repeat Signage presentations, which can be updated from anywhere in the world. When you insert a text label in your presentation you can choose to collect it's text from a website and point it at a text label on RepeatServer.com. You then get your presentation to monitor the online version for changes. When it detects that you have changed the text label in your online account, a new version of the text is automatically downloaded and played whilst your presentation is running.
Here's an example. You could use a plasma screen in the windows of several shops in different cities and include the display of a daily special offer message such as 'Today's Offer: two for the price of one on all biscuits'. You will want to be able to update this text in all shop windows from anywhere by logging onto RepeatServer.com. This is what you need to do:
1. Log onto your RepeatServer.com account and create a new text label called 'TodaysOffer' with the current text being 'Today's Offer: two for the price of one on all biscuits'. When added, make a note (or copy) of the text label's http address, which will look similar to this:
https://www.repeatserver.com/Users/YourCompany/TextLabel/TodaysOffer.txt
2. Create a Repeat Signage presentation for your plasma screen shop window presentations. In the Repeat Signage designer, click on 'Insert' then 'Insert text label'.
3. The 'Insert text label' dialog box will ask you where you text is located, so click 'On a website'. In the 'Page name' box, stick in the URL of your text label, such as:
https://www.repeatserver.com/Users/YourCompany/TextLabel/TodaysOffer.txt
4. Click on 'OK' to add the text label control. The next thing to do is to resize the control on the screen so that the label fits your text.
5. Double click your new text label control to see it's properties. Click on the 'Refresh' tab. By default, new controls that are collected from a website location will automatically check for changes every 15 minutes. You can set this value appropriately. If you need the presentation to update itself almost as soon as you make a change online, then set this value to check every minute, or 15 seconds, etc.
6. Give it a try. Set the refresh about to every 15 seconds and save it, then on RepeatServer.com, update the text label using the 'Update' link next to your text label and click on 'Update' afterwards. Your presentation will update itself (even in the Repeat Signage designer) within 15 seconds.
Placing text over the top of other controls such as pictures and videos
You can place text over the top of pictures, etc. To do this then move your text over the picture. If the picture is in front of the text, then you need to click on the picture and then right mouse click it and use 'Send to back' to put this behind you text. By default, the background colour of the text is white and you will see the text on a white background over the picture. You can make this background transparent.
To make the text background transparent:
- Double click your text to open it's properties.
- Click on the 'Colours' tab
- Select the 'Font colour is solid and background is transparent' radio button
- Click on 'OK' to save and apply
The text does lose some of it's quality as Repeat Signage doesn't anti-alias the text with controls that are behind the text. In most cases the quality is acceptable since most digital signage screens are seen from a few metres away. You tend to be around a foot away when designing your presentations. If the quality is not acceptable, then for pictures, you could specify an image as a background instead, which because they are part of the same control then anti-aliasing with be applied. See the 'Text background - Using gradient colours or pictures' section below. You can position the text anywhere on the background picture by using the properties' 'Font/alignment' tab to specify the 'Alignment' and 'Vertical alignment'.
Another alternative for pictures, rather than using text with a transparent background, is to add the text directly to the picture file using picture design/editing software. See the Picture control page for information on image editors. For adding text directly onto video files, see the editing video section of the Video control information page.
Making text transparent so that you see through the text to controls behind it
For example, you may want to put the word 'VIDEO' on the screen as a white rectangle with the word 'VIDEO' transparent so that you can see through the letters to a video playing behind it. To do this:
- Add a video control to the designer screen so that you can see the video playing. See the Video control page if you don't know how to do this.
- Make the video full screen, but clicking on it, then on the menu select 'Size/position' then 'Full screen'
- Insert a new Text label control on screen, manually typing the word 'VIDEO' and click on OK to display it on screen.
- You will see that it is black text on a white rectangular background, sitting on top of the video
- We need to make the font bigger, so double click the text to view it's properties
- Select the 'Font/alignment' tab and change the font size to something really large like '300'.
- Click on the 'Colours' tab
- Select the 'Font is transparent and the background is solid' radio button
- Click on 'OK' to save and apply
- This will change your Text label control, but it will now be too small to view all of the word 'VIDEO'
- Click on the text to highlight then on the menu select 'Size/position' then 'Full screen'
What you should have is text on screen which has the effect of having a moving font.
Fonts - Using gradient colours or pictures
When you insert a new Text label control, the font colour is black and the background is white. You can change the font colour to any solid colour, or you can use gradient colour. Gradient colour is where you choose 2 different colours and they fade into each other.
To use a gradient colour:
- Double click your Text label control to view the properties
- Click on the 'Colours' tab
- In the Font colour section, click on the 'Choose' button which will load the 'Choose text font colour' screen
- Change select 'GRADIENT' on the 'Colour type' list
- The preview will show you the colour which by default has black on the left and white on the right. Use the Choose button to select different colours for these.
- You can also change the 'Gradient type' box to choose the direction that the colours fade into each other
- When you are happy with the new colour, click on the 'OK' button to return to the previous screen
- Click on OK again to apply to your Text label control
To use a picture as a font colour:
- Double click your Text label control to view the properties
- Click on the 'Colours' tab
- In the 'Font colour' section, put a tick in the 'Use an image instead of a solid font colour' tick box
- Click on the 'Browse' button in the 'Font colour' section and then browser for a picture file
- When you have selected a picture file, then click on OK to return to the previous screen
- Click on OK again to apply to your Text label control
Text background - Using gradient colours or pictures
Follow the instructions as for 'Fonts - Using gradient colours or pictures above', but double click your Text label control, select the 'Colour's tab and use the 'Background colour' section.
Shapes and text clocks
Both of these controls can be inserted using the 'Insert' menu are actually Text label controls. The shape control is a Text label control without text, so you can specify the shape's colour using the background colour section of the 'Colours' tab, or select a picture or gradient colour. Text based clocks are just the Text label control with 'Clock (time, date or both)' selected on the properties' 'Choose text' tab. You could use gradient colours or pictures as the font or background colours for your text clock the same as for any Text label control.
Changing text on screen whilst a presentation is playing
When you insert text from a text file, rather than typing it in manually, Repeat Signage can check the file's date/time periodically to see if that file has been changed since your presentation loaded. For example, you may display text on screen in a shop with information on a special offer such as:
Today's offer - 2 for 1 on chocolate biscuits
If this text is in a text file on a network drive, such as n:\Offer.txt then you can change this text when ever you like by editing this file in Windows Notepad. You have to open the Text label control's properties by double clicking it, selecting the 'Refresh' tab and put a tick in the 'Check for updated content' tick box. If you tick the 'For local/network files - monitor file system for file changes and update ASAP' then Repeat Signage will monitor this file for when it changes. If you then update the offer in n:\Offer.txt to:
Today's offer - 3 for 2 on fruit cakes
then Repeat Signage will detect the change and update the screen usually within a couple of seconds. Instead of monitoring a local or network file, you can get Repeat Signage to manually check every, say 5 minutes (this also takes less computer system resources as the computer is not constantly monitoring the files). This is useful for content on Internet websites or FTP sites (Standard edition and above). For example, if that offer file was placed on the shop organisation's website, such as at www.yourcompany.co.uk/Offer.txt then if your presentation in one or more shops is pointing at this, then the offer would be updated within 5 minutes.
Collecting text from websites is very flexible as the head office can update text on screens. For example, there could be multiple shops and you put a file on the website for a different offer in each shop:
www.yourcompany.co.uk/OfferLondonStore.txt
www.yourcompany.co.uk/OfferEdinburghStore.txt
www.yourcompany.co.uk/OfferCardiffStore.txt
The presentations in each shop would collect text from their own text files. As long as you don't put links to these files from your website pages, then these files will never be seen by people browsing your website.
Your alternative to using the Text label control is to use the RSS feed control instead. Your first thought maybe that RSS feeds are collecting news from Internet websites. However, Repeat Signage allows you to create RSS feeds, which are basically text files that contain lots of text items to be displayed. These items can be scrolled or displayed one after another every few seconds. You can then publish these to network drives and get Repeat Signage to play them in presentations. With the Standard edition (and above), you can publish to either a public or private part of your website for presentations to collect from anywhere in the world. See the RSS feed control page's article on 'Creating RSS feeds for use internally within your organisation' for an example of how this could be used.
If you company has a number of text files that need to be updated, then you can use the Text Manager to allow these to be listed and quickly and easily updated from a single screen.
Database support
There is now an 'In a database' option with this control. (Corporate and Media Wall editions only).
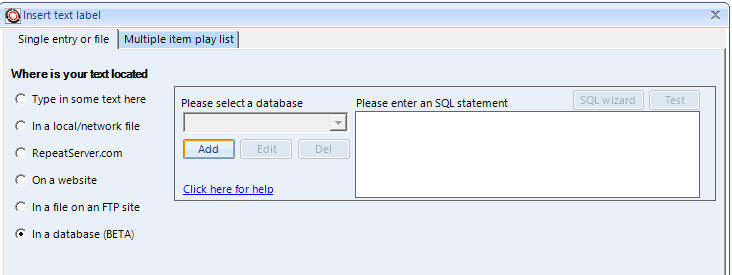
This allows you to collect a single piece of data, whether it be text, a number, a date, etc, and then display this text on screen. The SQL wizard button guides you through selecting a table, then a single record and then the field/column you want to display. Alternatively you can manually enter an SQL statement. IT Professionals can use the full power of SQL statements to collect summaries of data, such as the number of orders this week from a sales database, etc. Once you have collected your data and added your control to the presentation, you can double click it and you have formatting options, as well as all the usual options for text such as font, size and colour. For example, if you collected the number 15 from your database and use the Formatting tab:
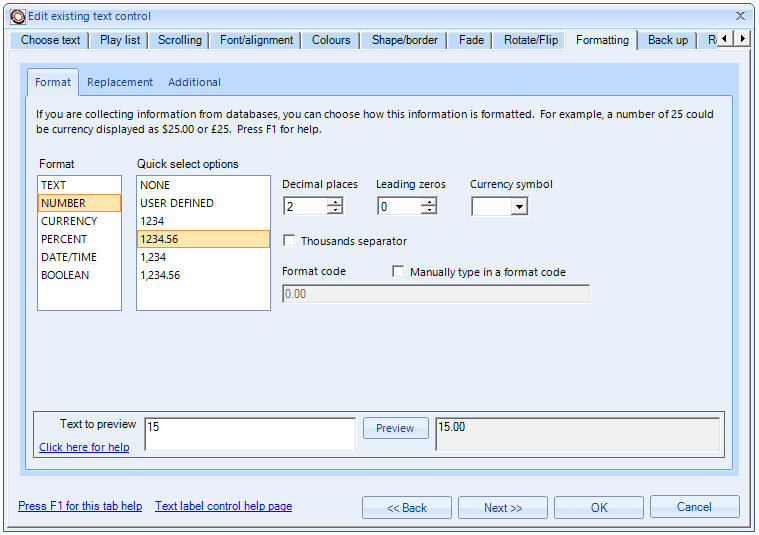
You can tell Repeat Signage how you want that information to be treated and displayed. On the above screen we have selected NUMBER as the data type which then gives us formatting options. Above we have selected 2 decimal places so 15 will be displayed to users as 15.00. If we used the CURRENCY option, then we can also select a currency symbol:
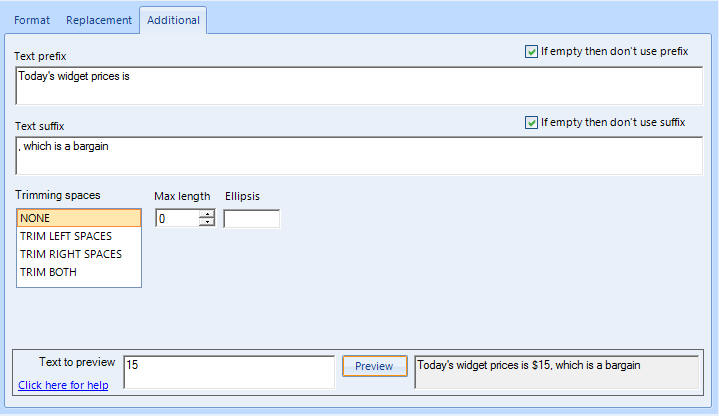
There are different options for different data types. There are currently 3 sub tabs under the Formatting tab:
Format - See the Formatting - Format tab help page.
Replacement - See the Formatting - Replacement tab help page.
Additional - See the Formatting - Additional tab help page.
The additional tab allows you to prefix and suffix your data. For example, you may want to treat your 15 as $15 and add text before and after it:
See Database support in Repeat Signage for more information including supported databases.
Displaying messages on screen
Read the above information on 'Changing text on screen whilst a presentation is playing'. The same system can be used in doctor's waiting areas by changing a text file on a network drive using Windows Notepad to something like 'Mr Smith to see Doctor Jones. In a noisy factory production environment, the same system can be used again for displaying messages to employees. When there is no message to display, then you remove all the text from the text file and the message disappears from the screen.
Text to speech reading of new messages for patient call or messing systems
In May 2013 (with Repeat Signage V2.4.7 onwards) we added text to speech support for the Text label and Text block controls. This means that when a text file is monitored, as in the 'Changing text on screen whilst a presentation is playing' section above, then Repeat Signage can also use Windows voice synthesizer to speak the text within your text file. See Text to speech for messaging and visit/patient call for more information.
Unicode support for Chinese, Japanese, Russian, Greek and other characters
From version 2.5.8, Repeat Signage now supports Unicode characters such as Chinese characters. The only restriction is that you cannot use then within the actual file name. See Unicode support in Repeat digital signage software for more details.
Creating TXT documents
Windows Notepad is a free text file edit that ships with Windows, and is usually found by clicking on the Windows Start button and in the search box at the side, type in 'Notepad'. Then click on the 'Notepad' app. You can only type in plain text in notepad. When you have finished, then save the document and the default format is 'Text Documents (*.txt)'. Your finished documents can be inserted in Repeat Signage presentations.
A word about fonts
This control uses fonts installed on your computer. These fonts need to also be installed on the computers playing your presentations for your presentation to look correct. See Fonts in Repeat Signage for more information.