
Picture control
| Supported file types | *.png, *.gif, *.jpg, *.jpeg, *.bmp, *.tif, *.wmf, *.pdf, *.doc, *.docx, *.odt, *.rtf, *.xps, *.rpic, *.xls, *.xlsx; *.ppt; *.pptx |
| Playlist support | Yes |
| Scheduler support | Hourly, daily and weekly scheduling plus iCalendar file support |
| Scrolling support | Yes |
| Rotation support | 0, 90, 180 and 270 degrees |
| Transitions | 25 transition effects when using the picture control in play list mode |
| File locations | Files and folders on local or network drives (all
editions), Internet websites,
RepeatServer.com and FTP sites (Standard and above editions) Corporate and Media Wall editions - Collect pictures from databases. |
| Training videos You Tube videos |
Repeat Signage Control - Picture Control
for single images (07:01 min/secs) Repeat Signage Control - Banner Control for playlist of images (03:38 min/secs) How to create and use Repeat Pictures in Repeat Signage digital signage software |
| Simple | Playlist | Simple scrolling | Simple scrolling with pause |
 |
 |
 |
 |
Advanced scrolling

(IMPORTANT NOTE - The scrolling examples above use animated gifs to give you an idea of different scroll types. Scrolling in the actual software is smooth and not jerky)
Description
Repeat Signage can display the most common types of picture files such as .gif, .jpg and .png which you see on Internet websites every day. It can also display a range of Microsoft Office documents such as Microsoft Word .doc and .docx files, Microsoft Excel .xls and .xlsx files. These are for whole pages from a spreadsheet file, the same as you would see if printed out. If you want to display specific sheets and cells from a spreadsheet, then use the Spreadsheet control instead. The Picture control can also Microsoft PowerPoint .ppt and pptx file slides If you display PDF files, Word documents, etc, they generally have multi-page pages. In play list mode, you can now use the 'Page' tab to specify that you would like to display all pages, or multiple pages, from your files. Support for multi-page Tif files has also been added.
Picture files have resolution, i.e. the number of pixels the image is made up off, for example, 640x480, 1024x768, 1280x1024 pixels, etc. Try to make sure that when you size a Picture control that you do not make your control bigger otherwise you may get a poorer quality of image.
There are 4,000+ Repeat Icons for you to use in your presentations. These can be displayed by the Picture control and the Banner control. These are available in the main Repeat Signage designer and also in the Repeat Pictures system which can be used to create adverts/pictures.

The Corporate and Media Wall editions of Repeat Signage also support database so that you can display images stored in databases.
There is now a 'Image of a website page' option that allows you to take a snap shot picture of a website and display this. See Image of a website page for more details.
You can now use local/network, website (HTTP), FTP and RepeatServer.com folders in your playlists.
Use iCalendar files to schedule control content.
Simple Pictures
On the designer screen menu, click on 'Insert' then 'Insert picture'. This will allow you to choose a Picture file. This defaults to 'On local or network drive'. Click on the browse button and choose a picture file and then click on 'Open' to return to the previous screen. Now click on OK to insert the new picture control onto the designer. You can then position and size your Picture control as required. Double click the Picture control to view the properties.
Cropping pictures automatically

The first picture above is the original image. The second picture shows a tall and thin image and the left and right sides of the image have been cropped (removed) rather than stretching the image. The third image is long and thin and the top and bottom of the image has been automatically cropped. The above images are cropped using our AUTOCROP CENTRE setting. You can access this by double clicking a picture control and clicking on the Crop tab. Press F1 on this page to access the help to see other options as well.
Playlists of Pictures
You can create a play list of Pictures. Insert Picture as for 'Simple Pictures' above. Then double click the Picture control to display it's properties. Put a tick in the 'Use play list instead' tick box. This will take you to the Playlist tab. Your first Picture appears in the grid for you. Use the 'Add' button to add other Pictures to the list. Use 'Add blank' to add blank items which can be used to give a pause between playing your gif files. For example, you could insert a single gif file and set it to display for 2 seconds. Then insert a blank item again for 2 seconds. This would then give the effect of flashing the Picture on and off the screen.
Placing text on top of pictures
You are better off using the Text block control instead. This is a text control, but it allows you to specify background pictures for the text. With the Text block control you can also specify different background colours or a background image for each play list item. Estate agents (realtors) may, for example, want to display a play list of house pictures with different text for each picture as price and location.
Scrolling Picture files
Create a play list of Pictures (see above). Open the control's properties by double clicking it and select the 'Scrolling tab'. Change the 'Scroll direction' combo box to an entry other than NONE, for example RIGHT TO LEFT. Click on OK to see it scrolling. For more scrolling options, on the properties 'Scrolling tab', press the F1 key to see the various options.
Also see Single, playlist, scrolling and advanced scrolling for visual examples of what is currently possible.
Scheduling the playing of picture files (Standard and above editions only)
The information on creating a play list above shows you how to create a play list that just loops files. On the play list tab, there is a 'Schedule type' drop down list. You can change this from 'PLAYLIST' to 'HOURLY', 'DAILY', or 'WEEKLY'. The difference between this and the 'PLAYLIST' option is that when you add items you have to specify 'From' and 'To' time values.
For example, an HOURLY scheduler can be used to play a file at the start of every hour for 1 minute (0 minutes 0 seconds to 0 minutes 59 seconds). You have to put in files to cover the entire hour. If you don't want anything playing for the rest of the hour, then insert a blank item that covers from 1 minute 0 seconds to 59 minutes 59 seconds. At the end of an hour, the entire hourly schedule will loop again. When you play a presentation, it displays items based on the current time or day.
When you add a blank item, you can decide whether to make the blank item display the background of the control (which you can specify a colour or picture for) or whether to make the entire control invisible. When adding or editing a blank item, go to the 'Blank item' tab and either tick or un-tick the 'Entire control is visible' box. This is useful for scheduling when you want a control invisible.
The DAILY schedule type allows you to specify files and blank items to cover the entire day. At the end of the day, the schedule will start again. WEEKLY allows you to schedule what happens on each day of the week (at any time), and then restarts at the beginning of the next week. Repeat Signage uses Monday as the first day of the business week. Another thing to note is that every control that supports scheduling runs independently of all others, so you can have lots of different controls all doing different things.
Tools have been added to Repeat Signage to help you test scheduling. On the designer screen menu, you can click on 'View' then 'View program time for schedule testing'. Clicking on this puts the time on the bottom right of the designer screen menu. This is the clock that Repeat Signage uses with controls. You can change this time using 'View' then 'Change program time for schedule testing'. This allows you to change either the time or date, so that you can see what will be displayed at any point. For example, you may have an 'offer of the day' for each day of the week, made by displaying pictures in a picture control. Changing the program date to another day will allow you to test that the correct picture file, with that day's offer on, is being displayed.
Playing picture files from RepeatServer.com or another website
You can create a free RepeatServer.com account and use this to upload picture files to your online account. When you insert a picture file in your presentation you can choose to collect it from a website and point it at picture files that you have uploaded. You then get your presentation to monitor the online version for changes. When it detects that you have uploaded a new version of the, then this is automatically downloaded and played whilst your presentation is running. You can do this in the following way:
1. Create a free RepeatServer.com if you haven't already done this. This can be done by visiting www.RepeatServer.com in your web browser or via the 'RepeatServer.com' tab on the main Repeat Signage screen.
2. Log onto your RepeatServer.com account and on the menu click on 'File' then 'Upload files'.
3. Use the 'Browse' button and then locate your picture files on your hard disk (hold down your keyboard Ctrl key to select more than one at a time) and then click the 'Upload' button.
4. On the RepeatServer.com menu, click on 'File' then 'Documents and files' list.
5. Find the line in the grid for one of your picture files that you just uploaded. (You may have to use the page buttons if you can't see your file on the first page).
6. Back to Repeat Signage. Go to the main screen and select the 'RepeatServer.com' tab. If you haven't already linked your Repeat Server account to Repeat Signage, then you will need to follow the instructions on screen. When this has been done, then please click on the 'Refresh' button to display all your Repeat Server files, which should include all the files you have uploaded. This needs to be visible before we can continue.
7. Create a Repeat Signage presentation on your computer or open an existing one. In the Repeat Signage designer, click on 'Insert' then 'Insert picture'.
8. Click the 'RepeatServer' option and a list of your files will be displayed, which will include any you have just added above. Now select your file by clicking on it, then click on the 'OK' button.
9. Click on 'OK' to insert the control. The next thing to do is to resize the control to an appropriate size.
10. Double click your new control to see it's properties. Click on the 'Refresh' tab. By default, new controls that are collected from a website location will automatically check for changes every 15 minutes. You can set this value appropriately. If you need the presentation to update itself almost as soon as you make a change online, then set this value to check every minute, or 15 seconds, etc.
To give this a test:
11. Edit the picture file and make some changes (or overwrite it with a different picture file).
12. Log onto your RepeatServer.com account and upload the new version which will overwrite the original.
13. Your presentation will update itself (even in the Repeat Signage designer) within 15 seconds.
You don't have to use RepeatServer.com as you could use your own website instead and use FTP software to upload and download files.
Transparency colours
Some gif and png files use a transparent background so that instead of having a rectangular picture of say 640x480 pixels, the image can be any shape such as an orange with the background transparent. On the control properties, use the 'Transparency colour' tab to select colours to make transparent. You may have an image on a white background and can use this tab to make white transparent.
Colour effects
You can apply colour effects to any pictures:
Greyscale - Makes the picture 'black and white'.
Sepia - This removes the colour and just displays the picture in a brown colour like in old photographs.
Negative - Inverts all the colours in the picture to give a weird effect which can be very striking.
Sources of Picture files
We have included 100 low resolution (800x600 pixels) images in the installation package. The full size versions of these plus over 1,000 other images are available on our RepeatServer.com website. Simply sign up for a free account and then you can browse images for use in your presentations, and then download the ones you want in a single .ZIP file.
Digital cameras
Use a digital camera or hire a professional photographer to take pictures. You can take pictures of objects, such as an exterior shot of your organisation's offices, and use them.
Scanners
Flatbed scanners are useful for scanning documents onto your computer which can be saved as picture files, PDF's or can extract the text from documents using OCR. Scanners that scan old photograph negatives are also available.
Document cameras
Document cameras can also be used to take pictures of small items and also record videos. Document cameras are effectively video cameras mounted on stands that are used to display small objects such as books, jewellery, insects and small items under them and then capture still images or record videos. These normally come with software and USB cables to record display and record the images on your computer. Microscope attachments are available on some models.
Your company website
If your organisation already has a website, then the website designer may already have used pictures of your organisations logo and other images on the website. When you browse to a website in Internet Explorer, you can right mouse click on pictures and then use 'Save Target as...' to save the picture file to your hard disk. Please see our information on copyright issues if you are taking image from Internet sites that do not belong to your organisation.
Windows Snipping Tool
You can capture a shot of whatever is on your computer's screen, such as a full website page, and then capture part of the screen to save as an image file. The Windows Snipping Tool is available in Windows 10 and 11.
Pictures from the Internet
You can get pictures off Internet websites. Please see our information on copyright issues. Please remember that images on websites are usually copyrighted. However the Internet is great for collecting images to draft presentations:
https://en.wikipedia.org/wiki/Wikipedia:Public_domain_image_resources - This is a list of public domain sources for images. Some of the images on the sites in this list do have some sort of usage restrictions. Please check the usage rights of any image you use and make sure it is public domain. It is also a good idea to keep a list of the website addresses you collected images from that you use in your presentations. If there was ever an issue with an image you display using Repeat Signage, then at least you can reference the source of the image easily.
https://pixabay.com/ - There are some very professional images on this one, with a good search system.
www.Flickr.com - This site allows you to view millions of pictures which can then be downloaded. This is a good place to get images to draft presentations. However, please read the copyright under the 'License' section of image pages as many images are either fully copyrighted or only free to use for non-commercial use. You could contact the picture owners to negotiate a price to use specific images if required.
Google.co.uk - On the main Google page, then click on 'Images' in the top right corner. This allows you search for images which are on Internet websites. Also look for 'public domain images' for copyright free images.
Also do a normal Google search for 'pictures' and 'copyright free pictures'. This will give you a list of sites for images.
Saving a complete website page image
On the main Repeat Signage screen, under the 'Free tools' menu is the 'Save complete website page image' tool. This works by putting in a website address, such as https://www.repeatserver.com, and it will save an image of the full page. For example:
This free tool works for most website pages. Some pages are very long so you get a long tall image.
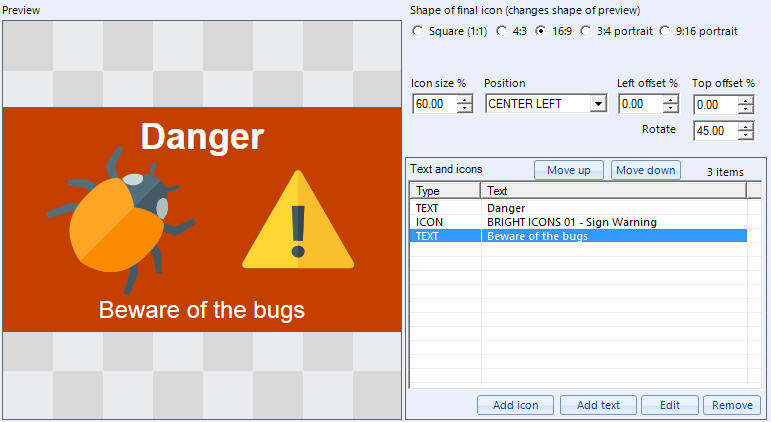
Repeat Pictures (.rpic files) - Creating pictures and adverts to use with the Banner control
We have a picture creation tool inside Repeat Signage called Repeat Pictures. Repeat Pictures are a picture format that allows you to use pictures, PDF files, documents (MS Word and OpenOffice Writer), text files, RTF files, shapes, as well as manually entered text to create images. You design still images and then save the file which has a .rpic extension. You can display .rpic fles with this banner control. You can also use Repeat Icons in the Repeat Pictures system. There are a number of templates included to help get you started:

See Repeat Pictures for how to get started or have a look at this video:
How to create and use Repeat Pictures in Repeat Signage digital signage software
Creating and editing picture files
In addition to the built in Repeat Pictures system, these tools may be helpful for creating pictures and adverts:
Microsoft Paint is a free graphics package that ships with Windows XP, Vista and 7, and is usually found by clicking on the Windows Start button (or Start orb in Vista/7), then 'All programs' then 'Accessories' then 'Paint'. This allows the creation of basic images/pictures and can be used to resize pictures and save pictures in different file formats, for example, change a .bmp file (which is uncompressed) into say a .gif file (which is compressed).
Windows Live Photo Gallery is free photo editing software. This allows the cropping of pictures, retouching, red-eye removal, colour and exposure changes, and effects such as sepia.
OpenOffice, the free office suite, has a graphics design package called OpenOffice Draw which allows images to be created from scratch. There is also a presentation package, performing a similar to job as Microsoft PowerPoint, which allows 'slides' to be created very easily. These can be exported to image files, such as .png, or to PDF files which can be displayed with the PDF control. Exporting as an image will give better performance.
Microsoft Office has some excellent creating features so that you could create pictures by using Microsoft Work, Excel, PowerPoint, Visio (flow charting software) and export to a picture, such as a .png file for display in Repeat Signage.
There are a huge number of graphic design and picture exiting software products on the market. Try a Google search on 'free picture editing software'. There are also websites that allow you to upload pictures, edit them and then download the finished picture.
Google Picasa - http://picasa.google.com/ for photo editing.
Adobe Photoshop is the most professional image editing tools, along with a professional price tag. However, you can download a free trial of these products to your computer and use them to edit images for your presentations. Serif PhotoPlus software is available to download free of charge. Corel also do a range of photo editing and graphic design software. Microsoft is currently free of charge as it has been discontinued.
Printing from other programs directly to a playing Repeat Signage presentation
If you have a PDF/Image printer installed on your system then you can print from any program (Microsoft Word, Excel, PowerPoint, Visio, Internet Explorer, etc.) directly to a PDF file. Many applications, including most graphic design packages have the option to export files in picture or PDF format. For example, OpenOffice, the free office software enabled you to export directly to image files.
There are several free and paid for PDF/Image printers on the market. The BullZip PDF printer is completely free and works with Windows XP, Vista and 7. BullZip also allows you to print to picture files such as .png files.
BullZip (and other PDF printers) work in the following way:
1. Click on 'Print' in your program (Word, Excel, Paint, etc.)
2. Select which pages to print in the Print dialog box and select the printer name, which you change to 'BullZip PDF printer' if this is not the default printer.
3. Click on OK to print.
4. You are the prompted by BullZip to enter a name and location for your PDF file. We want to print to an image, so change the 'Format' drop down to one of the image formats such as PNG Type on in and click on 'Save'. BullZip has loads of other options when producing PDF's or images.
The above is useful for digital signage. You can insert a picture file in your presentation and then double click the picture control to open it's properties and use the 'Refresh' tab to tell Repeat Signage to monitor the original file for changes. This means that when you print to the same picture again, Repeat Signage instantly displays the new picture on screen. Imagine that you have a reception area and are expecting important visitors from one of your clients. You could create a document with a welcome message and that company's logo on and display it on a plasma screen by printing or exporting it as a picture file. When the next customer is expected, then the receptionist, on another computer, can 'Print' off a new copy of the document with the next customers details on. The picture file would have to be on a network drive so that the computer attached to the plasma screen would read the picture file from there and the receptionist would be able to print and overwrite the picture file on the same network drive from her computer, or indeed any computer with access to the network drive. Remote users with network access to that drive, via a VPN (Virtual Private Network) or via dialup software such as PC Anywhere, could overwrite that file allowing presentations to be updated as they are playing for anywhere in the world.
Repeat Pictures (.rpic files) - An easy way to create pictures including adding text
Repeat Pictures are a picture format that allows you to use pictures, PDF files, documents (MS Word and OpenOffice Writer), text files, RTF files, shapes, as well as manually entered text to create images. You design still images and then save the file which has a .rpic extension. See Repeat Pictures for more information.
This is particularly useful for adding text to pictures. You can insert pictures, manipulate them (such as cropping and resizing) and add text. Then save the result as a .rpic file, which can be used with this picture control. However, this doesn't change any of the original picture files.
Database support
Some databases, such as Microsoft Access and Microsoft SQL Server, have binary fields which can be used to store images or other files. You can use the 'In a database' option and follow the wizards to collect images from your database. You can also collect picture file names from text fields. For example, if you a have 'PictureLocation' text field in a database table which contained the complete location of a picture file such as:
https://www.repeatsoftware.com/images/RSBanner03.jpg
or
C:\MyPictures\DSCN1470.JPG
Then Repeat Signage will automatically collect and display the picture file. Normally it will be advanced users or IT professionals that would use this option. Please contact support@repeatsoftware.com if you need any help with this.
Repeat Icons
You can use any of our Repeat Icons to help you create simple signs with this control. Repeat Icons allows you to build up a picture/slide to play with this control by combining text and icons. There are also thousands of additional icons available.
Displaying Microsoft Excel spreadsheet pages with the Picture control
See Microsoft Excel and OpenOffice Calc spreadsheets in Repeat Signage digital signage software.
PDF and Word document compatibility
See our PDF file compatibility page if you have any issues with displaying PDF files and our Microsoft Word and OpenOffice Writer documents in Repeat Digital Signage software if you have any problems with Word documents.
Exporting from other programs directly to a playing Repeat Signage presentation
See the above on 'Printing from other programs ...'. Many packages, such as OpenOffice applications allow export to either image files, such as .png files, or to PDF files. Instead of using a print driver to do this, which may be restrictive in the sizes of images produced, then you can export as an image instead to overwrite a playing file.